After all the circuit lessons I’ve had recently, I was really looking forward to doing something different. Today’s lesson would be on advanced turning. “How can turning be advanced?”, I hear you ask. Well, essentially, it’s a fancy way of saying steep turns.
We’d be looking at two different steep turns today:
- 45 degrees of bank
- 60 degrees of bank
These are steeper than the climbing turns (15 degrees of bank) and standard turns (30 degrees of bank) that I’ve been doing up until now. In the pre-flight briefing, I learnt that in normal flying we wouldn’t normally do any steep turns. The reason we learn them is primarily to practice it as a collision avoidance technique. I’m hazarding a wild guess that even without this lesson, if I saw a plane coming straight towards me I wouldn’t instinctively have done a ‘normal’ turn anyway – but hey.
As the angle of bank increases, the wings have to create greater lift. You create greater lift by increasing the angle of attack. Much more back pressure is required when doing a 60 degree turn than when doing a normal turn.
For a given airspeed, the angle of attack in the turn is greater than during level flight. This means the stalling speed is higher during the turn. You wouldn’t want to be doing a steep turn when flying slow (like turning on to final, for example) or low.
During normal straight and level flight, the wings create sufficient lift to support the weight of the plane.
Lift = weight and the load factor is 1g
During a turn, load factor increases. In a 60 degree turn, you’ll experience 2G. Fighter pilots can experience up to 9G. Aircraft are certified to withstand up to a specified load factor – typically around 3.8g for a light aircraft. The Va airspeed is the maximum airspeed at which full and abrupt control movements can be made, without risk of over-stressing the aircraft. If you’re above Va, you need to be very careful not to make any sharp control movements or you’ll risk breaking the plane, and nobody likes to watch a wing fall off.
To do a steep turn to the right:
- HASEL checks
- Roll right
- As you go through 30 degrees, increase back pressure, full power, and use right rudder to keep in balance
- Roll off, using rudder to balance
- Power
- Positively select straight and level attitude
- Trim
A steep turn to the left is slightly different, but to keep in balance you need to rudder right and left (because of the yaw effect from the increased power).
When doing a steep turn, if you don’t apply enough back pressure you risk entering a spiral dive. The natural instinct is to pull back to try and stop the descent, but this is the wrong thing to do. Instead, you should move the throttle back to idle and roll the wings level (out of the turn). Then gradually pull back to reduce airspeed. Once airspeed is lower than Va, apply power and climb as normal.
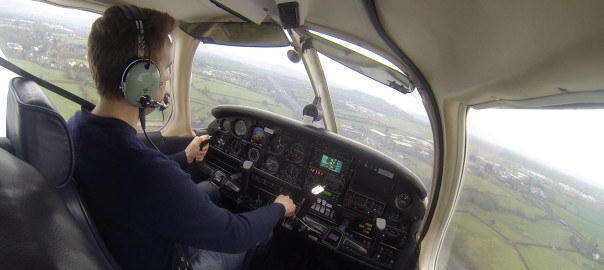
After checking the aircraft, we taxied out and were soon up in the air. We climbed to 3500 feet and carried out a HASEL check, having a good lookout to make sure nothing else was nearby. My instructor demonstrated a 60 degree turn. Wow. Feel the g-force! My cheeks felt pinned back and it was a struggle to move my arms. I wanted – no, needed – to have a go at this! My first 60 degree turn went ok. I underestimated just how much back pressure is required to stay level, but eventually worked it out. When rolling out of the turn I didn’t release enough back-pressure and we ended up about 300ft higher than when we started.
After a couple more, I had the technique nailed and was able to do a level steep turn to the left and the right. 45 degree turns feel rather sedate compared to the 60 degree turns, whilst the 30 degree turn feels positively balmy after all that steepness. If only all turns could be at 60 degrees, it would be such fun (probably not for the passengers in the back though!).
We intentionally entered a spiral dive and recovered using the correct technique. Like stalling, in the Warrior it’s a bit of a non-event really, so long as you follow the appropriate recovery technique.
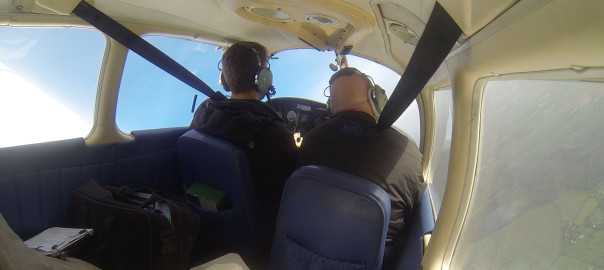
After a few more practices, we decided that we’d done everything we’d needed to for this lesson, so we headed back towards the airfield. On the way, my instructor put up the Instrument Screens – essentially big sheets of plastic that literally block the pilots view so that you can’t see out – to give me a taste of the IMC (instrument meteorological conditions) lesson coming up.
When you qualify as a PPL, you’re only allowed to fly in VMC – visual meteorological conditions, which are a set of rules specifying visibility, distance from cloud, etc in different classes of airspace. Essentially, you need to be able to see the ground so that you can navigate based by the features of the ground. To fly in worse weather conditions (eg. fly in IMC conditions) you need to be either Instrument Rated or have an IMC licence. The PPL syllabus includes an hour of IMC instruction designed primarily (I think) to scare people from wanting to intentionally try a flight in IMC.
So, with the screens up (and my instructor acting as the lookout – he had full visibility) I had to perform a series of manoeuvres like flying straight and level, regular turns, climbing and descending. I’ll go in to this more after having the full IMC lesson, but basically you need to learn to trust the instruments and ignore your human instincts. Your inner ear easily gets confused and gives you the sensation that you’re climbing or descending when in fact you could be doing neither. There’s a certain order and frequency you need to monitor each of the instruments, and the workload is insane.
I think I managed to fly pretty well using the instruments and didn’t find it very scary. My instructor seemed to agree as he said “you’ve obviously spent way too long on flight simulators”. A fact, sadly, I can not argue with.
After a while, we took the screens down and planned our approach. I was introduced to yet another mnemonic, CARPACER, as a template to use in radio communications:
- Callsign (eg. G-GFCA)
- Aircraft type (PA28)
- Routing (Flying Gloucester to Coventry)
- Position (5 miles north of Tewksbury)
- Altitude (2000ft on 1020 QNH)
- Course (Heading North)
- Estimate (Estimate Coventry at 55 (minutes past the current hour))
- Request (Request basic service)
Apparently that format can be used pretty much in any situation where you’re unsure of what to say.
So, to request our rejoin, we used:
- G-GFCA, Tewksbury, 2000ft on 1001, heading south, request rejoin
(You don’t have to say all elements – use your discretion. Not much point in giving an estimated time, as ATC will have a pretty good idea how long it takes to get to them from Tewksbury. No need to say aircraft type as we were already on a basic service with them.)
Another week, another mnemonic to learn.
I wanted to practice overhead joins (I’ve only done one) so I asked for one, even though we were flying south towards the airfield and the active runway was 18. ATC obliged and asked us to report 3 miles from the field. We did so, and were handed over from Approach to Tower. Tower then asked us if we would mind taking a direct join on final so we agreed and after a relatively smooth landing, it was all over for another few days.
Here’s a little video clip of me doing a 60degree turn. The audio didn’t record for some reason, so excuse the crappy dubstep. Look at how steep everything looks out of the window – it really was like that!