Following on from last week’s lesson, this time we’re looking at climbing and descending in various configurations of power and flap.
For climbing part two, in the pre-flight briefing we talked about the best angle of climb. Note the difference between best rate of climb (from part one) and this new concept of best angle. As you’ll remember from last lesson, the best rate of climb will get you to the highest altitude in the shortest amount of time. The best angle of climb will get you to the highest altitude in the shortest ground distance.
I’ve tried to draw two climb profiles to represent the difference:

In the Warrior, the best angle of climb is achieved when climbing at 65kts. When would it be useful to use the best angle of climb, I hear you ask. It’s useful if you have a short runway with an obstruction at end of – maybe some tall trees or electricity pylon. In this instance, you want to gain as much height as possible whilst travelling the least horizontal distance, so that you can clear the obstacle. Once you’re at a safe height, you’d then pitch the nose down to the best rate of climb attitude (or a cruise climb, at around 90kts if you’re happy to climb slowly).
For descending part two, we talked about the effect of flaps. Flaps can help to increase lift, but can also increase drag. This means that you can use flaps to increase your rate of descent. We drew up a table for logging the effects of flap, power, and flap & power, then went out the plane. I performed my first A-check (it was the first flight of the day) and worked my way through the checklist. All went well (once I had found where everything was!).
We pretended the take-off was on a shortfield, and therefore climbed at 65 (the best angle of climb) until we reached around 300ft which was well clear of any obstacles. Everything went as expected, although looking down at the runway it looked longer and thinner than normal – because of the higher nose attitude.
We then measured the effect of descending in various configurations. Here’s the data I logged:
Effect of descending with power (at 75kts)
| Power | Ft/min |
|---|---|
| idle | -550 |
| +200rpm | -450 |
| +200rpm | -400 |
| +200rpm | -300 |
| +200rpm | +100 |
Effect of descending with flap (at 75kts)
| Flap | Ft/min |
|---|---|
| Clean | -550 |
| 10 degrees | -650 |
| 25 degrees | -750 |
| 40 degrees | -950 |
We then experimented using power and flaps for descent. To achieve an airspeed of 75kts and a descent of 500ft/min with 25 degrees of flap, 1500rpm of power was required. Obviously the required power setting will vary depending on the plane, the weight of the passengers, fuel etc but the point of this was to get used to the standard landing profile.
One of the most important things to come from all of this is to remember:
- Attitude controls speed
- Power controls descent
We then headed back to the airfield and I used my new knowledge to fly the final approach down to the runway. Runway 27 at Gloucester has PAPI lights (more info below), which show you whether you are too high or too low. This made judging the correct ‘picture’ of the airfield easier for me, although I mustn’t get used to relying on it as many runways don’t have visual indicators. I actually found judging the right descent profile to be fairly instinctive – perhaps from the many hours of playing on flight sims, or maybe just beginners luck.
Our lesson had run-over a bit so the de-brief was pretty brief, but essentially it was re-affirming the golden rule of attitude controls speed, power controls descent.
Next lesson will be turning.
PAPI stands for Precision Approach Path Indicator. Here’s a photo showing PAPI lights to the right of the runway:
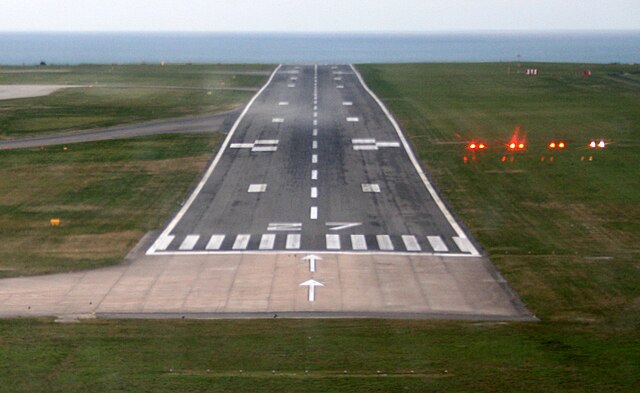
The lights are angled along the vertical glidescope, so that the colour changes depending on your height. If you are on the correct glidescope, you’ll see two red and two white lights. If you’re too high, you’ll see all white. Too low, and they’ll be all red (and you had better gain some height pretty quick!). Three red, one white = a little low. Three white, one red = a little high.
Hi Nic
What a super & informative blog. I’m learning much from it. You progressed just a little quicker than I’m doing. I’ve just had lesson 6 on medium turns. A couple of questions if you don’t mind.
What settings did you use on your gopro? Pix look nicely exposed.
How did you cope with changing light (eg sunlight) when manoeuvring?
Thanks
All the best
Mark